Everywhere I turn lately I see butterflies; and not just because it is Spring. :) In paper collections, embellishments, in videos, everywhere. So in celebrating the loveliness of Spring and keeping in line with the butterfly theme, I decided that I would make a Butterfly Mini Album. Now this album may be a little different than what you have seen so far. To make this album I will use the Cricut Expression and the Plantin Schoolbook cartridge. You're probably wondering how I am going to pull that one off since there are no butterflies on that cartridge. Well for my next trick or blog (meaning this one) I will attempt to make a Butterfly Mini Album using recycled chipboard and the Cricut Plantin Schoolbook font cartridge. Now, onto Step One
Step 1:
Chipboard is everywhere around us. From cereal boxes, to USPS mailing envelopes, to the back of a loose leaf tablet; all we have to do is look. So start with some chipboard. You can buy if you need to. I am going to recycle this cereal box of Honey Nut Cheerios. Cut the box apart on each and every fold.


Step 2:
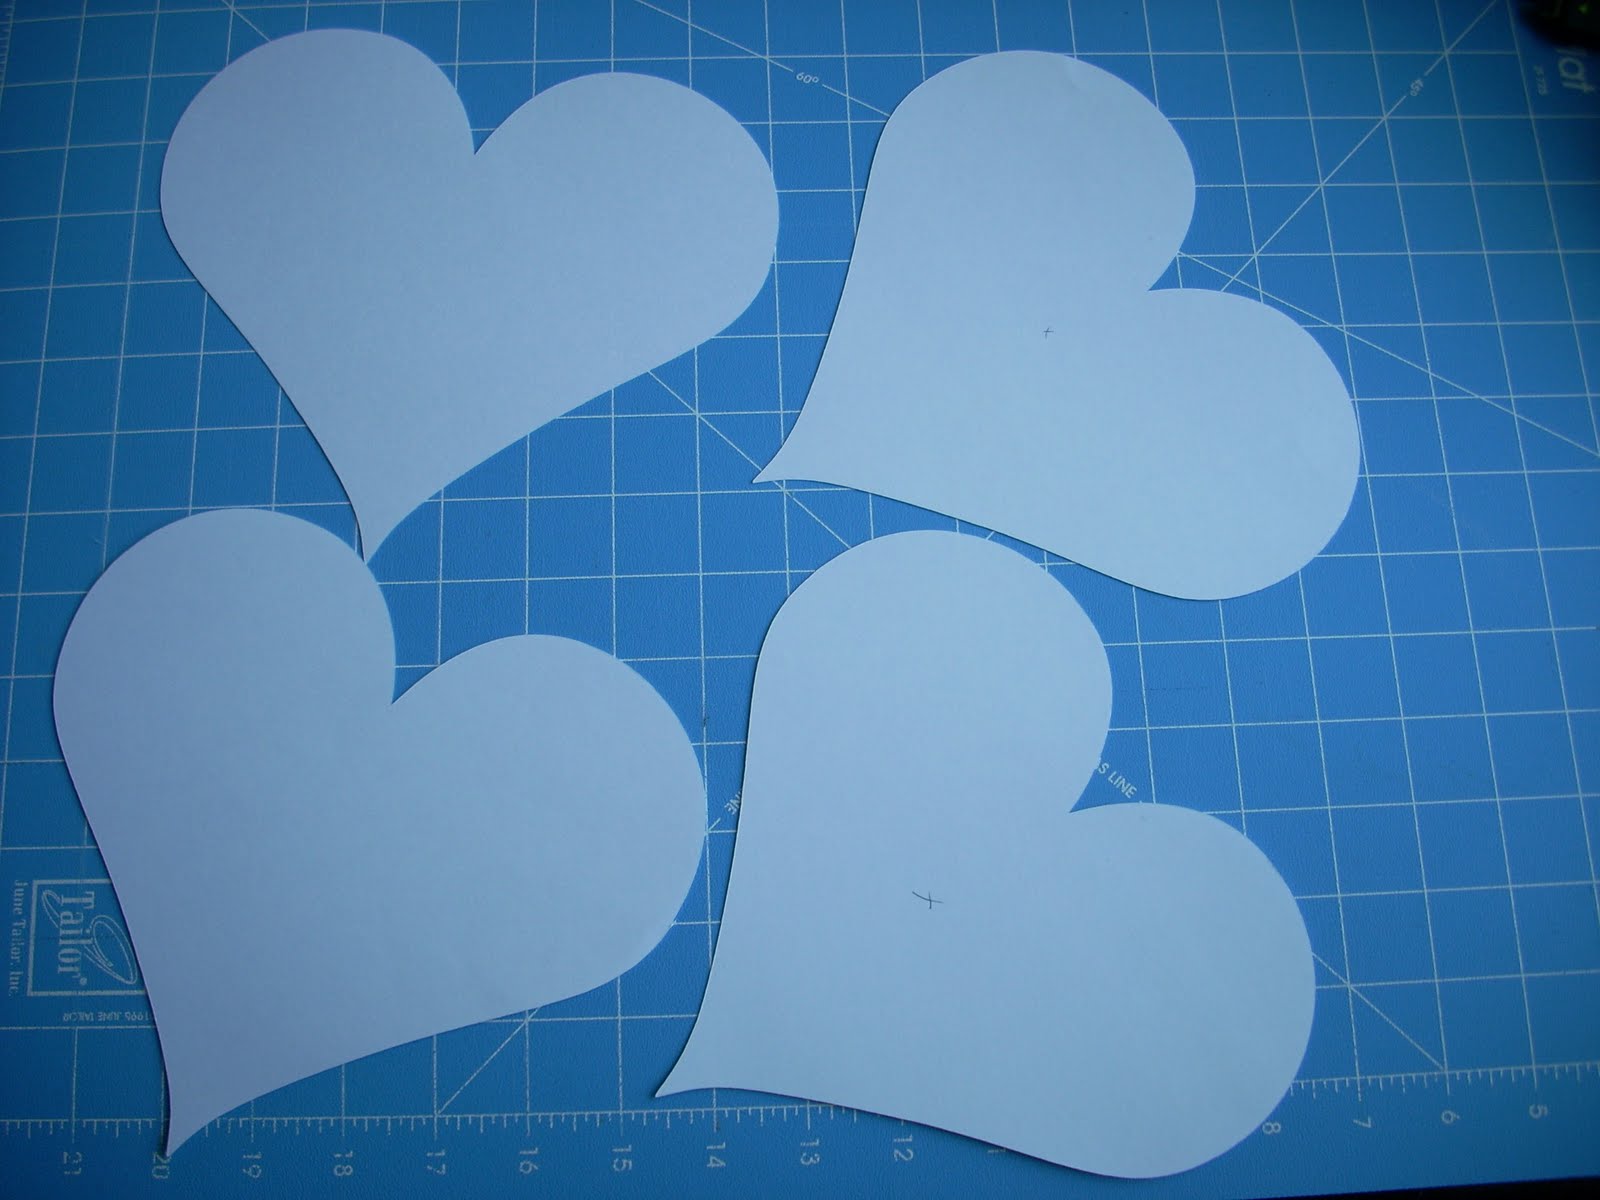
The length of your box (left-right) will determine the largest size image you can cut. The box I used is 7 1/2" so I will cut my image at a size of 7". Cricut time! Place your Cricut size on 7", your pressure on max, your speed on high, make sure the Plantin school cartridge is inserted, and then press the HEART button and cut. Yes, I said the heart button. This heart will create your butterfly. You will need to cut this multiple times. I recommend cutting this image 4 times.
Once cut, you will need to cut the heart image again on the second panel but this time use the flip image. The flip is so that the hearts, when back to back, line up nicely. Make sure to mark which image is the flipped image. The flipped one will be your back cover.

Repeat this process for the inside pages. You can make as many pages as you desire. If you don't have extra chipboard then you can cut hearts out of card stock and glue them together. For my butterfly I cut out 4 pages or 8 hearts with my Cricut using card stock. (Hey, there's only two of us in the house right now and we can't eat cereal that fast). Then I glued one of the regular cut hearts and a flipped heart together

When we were kids, one of the first images that we learned to draw was butterfly because it was so easy to do. Well, at least I did. I remembered that making a butterfly was as easy as drawing two '3's side-by-side; this gave you the wings. And then I remembered that to make a heart you use a '3' and a 'V'. So I added two and two and I got a butterfly.
Step 3:
Now measure and cut 2 inches off from the bottom point going to the top of the heart. This is where the shape of the butterfly really starts to take form. Repeat this process with each page you created.


Step 4:
Cut your holes for binding. If you are using binder rings then this is the point where you would want to punch your holes; this way when you cover the heart/butterfly wing with paper you know where to re-punch the holes. If you are using another binding method then you may want to skip this part.
Step 5:
Now is the time to cut all the patterned paper for your inside pages and covers. I decided to use a designer stack that I have had for awhile. So, I chose the "Jolie Chocolat" 8x8 paper stack by S.E.I. I think this paper is just perfect for a butterfly. Assemble your patterned/designer paper and glue them to each of your hearts. Don't forget to mark which pieces are the flipped cuts. You will probably want to adjust your cricut settings since you are not cutting the chipboard any more.

Step 6:
Now, all that is left to do is to embellish, create your tags and add your pics. At this point my album is pretty much done minus the photos but I still have a few more embellishments and tags to create. But I will show you what I have done thus far. Feel free to leave comments and let me know what you think.
This is the cover...

Inside cover on the left and page 2 on the right with two tags...

Page 3 has a butterfly insert with a little mini album hiding inside the butterfly...


Page 4 has a circle photo-mat with journaling on the back and a huge floral cut out with room for more journaling.

Pages 5 and 6 have pockets with loads of tags...


Page 7 and inside of the back cover...

This is just a quick view of the album as it stands right now. When I finish the album completely I will do a video and show you all. We just got a new camera so prayerfully the video will come out nice and clear.
***Update: So I have created a new album that was Published in the July, 2013 edition of Cricut magazine. Here is the link to see the photos: http://favor8favors.blogspot.com/2013/10/ive-been-published.html

So until later everybody. Thank you for sharing some time with me.
Kelli
Favorite Favors
"Lord, I open my heart. Fill it with nothing but You. I open my heart, as the old gives way to the new. Lord, cleanse me with, Your holy fire, until all that remains is earnest desire. To open my heart and be filled, with nothing but You." ~sung by Nicole Binion on album the "When Women Worship" by Mary Alessi & Friends


8 comments:
This is AWESOME! I love it! I so have to try this now. Thanks for sharing it! :)
Nita
www.niftynitanotes.blogspot.com
Oh My Gosh!!! What a wonderful project. It came out so beautiful. It is amazing what a cerial box and some creativity can make. Thank you for posting all the pictures.
How cute is this mini, thanks for the inspiration
This is so beautiful!! Thank you for sharing this beauty with us!!!
HUGS
Oh my gosh, this is GORGEOUS!!!!!! I love love love it. Here's from MAKE IT MYSELF MONDAYS. Hugs!! :) Janis
Very pretty, i have never thought about cutting cereal boxes with the cricut!! I am a new follower!!
sierrababy08 at hotmail dot com
That's gorgeous! Love the colors and how the entire album came out. TFS.
http://lorisartsyobsession.blogspot.com/
Your butterfly album is absolutely gorgeous. I love all the papers that you chose. I just became a great aunt and I may use the design to make a butterfly book for my new niece. I know she can't read yet, but someday she will and she'll know how much the butterflies and her aunt love her.
Sherry
www.upordowntheyrebeautiful.blogspot.com
Post a Comment