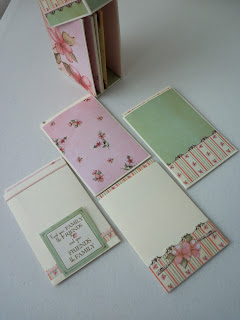
Thursday, June 27, 2013

5 Away from a Giveaway!!

Hi Everybody,

Sometime ago I had a Thirty Fabulous Followers giveaway.  And I hinted that when I reached 50 that I would host another one...Well, we are getting close, 45 to be exact. Just 5 more to go.  So be on the lookout cause it's gonna happen!!  In the meantime I am going shopping to prepare for the approaching milestone!  :D


A HUGE thanks to all those who have stuck in there with me and helped me reach 45!  I could not have gotten this far without you!!!

Love you all! 

~Kelli

Tuesday, June 25, 2013

Practical Scrappers - Home Decor Vellum Luminary

Hi Everyone,

Today I am sharing with you a project for Practical Scrappers.  The challenge was 10 ways to use vellum.  I chose to create a home decor piece and created this Luminary. Easily done and crafted within an hour or two.  I tend to craft projects for myself slowly.  Anywho, here it is...


You can see the natural sunlight coming through in this picture.
 
The sun is setting and you can see the luminary really glowing.


 I am very pleased with how this came out.  I used cereal box chipboard and some contact paper to create that wood grain look.  The first pic really shows the wood look.  I did use my Cricut and the Paper Laces cartridge to cut out the design. This luminary measures 6x6x6.

This was so simple to make and looks fantastic! I can easily see making more of these.  I want to make another one and place a drawer beneath it.  That is going to be a lot of fun to make.

Ok everybody, I really hope you guys get inspired to make one of these beauties for yourself.

Thanks for stopping by and sharing your time with me.  I will see you all in the next one.

Kelli

What I used...
~Cricut Paper Laces Cartridge - Cut at size 6"
~Wood Grain Contact Paper
~Cereal Box Chipboard
~Two 12x12 sheets of blue vellum
~Battery powered light

Sunday, June 23, 2013

Flip Top Mini Album - Mini Album Monday #4

Hi Everybody,

The Mini Album Monday project I am sharing with you today was created from a tutorial from The Gentleman Crafter.  He made this Flip Top Mini Mini and I fell in love with it and had to try my hand at it.  This project was a great way for me to use the 6x6 packs of paper that I found in the Michael's bins. I have accumulated quite a nice supply and challenged myself to use the paper line and nothing else.  Fortunately for me I also had the greeting cards to match one of the Paula Dean paper lines.

So without further ado, here it is...

***Loads of pics to follow.


First 3 of 7 of envelopes... Front and Back views.  There is a bit of sparkle on the eggs in the first photo.

 Tags Inside the these envelopes...

The final 4 of 7 envelopes... Front and Back views.

The tags inside the 4 envelopes...

The inside of the Flip Top Mini Box...

The outside right of the box...


Isn't it Sweet!  Just like my dear friend to whom I am dedicating this album!  Now, I don't condone the statements made by Paula in her recent press, nor do I agree with it.  Proudly being a Woman of Color, I am disgusted in the comments that were made, however, I made this project before the news of this incident had come to light.  I still think the paper is beautiful and I will most likely add my final embellishments to this mini album and put it up for sale in my Etsy shop, Luv Unlimited.  100% of the proceed will go to the fight against cancer in memory one of my dearest friends who just lost her fight to cancer last week and loved Paula.  This is my way of honoring her memory.  Turning Tragedy into Triumph.

Okay before I start crying I am going to sign off.  My friend and I were very close.  She and I saw a lot of laughter and tears together and was a true Prayer Warrior, Woman of God, Beloved Mother, and a True Friend.  I miss her dearly.

Ok guys, thank you all so much for stopping by and sharing your time with me and I will see you all in the next one.

Kelli

What I used...
~Recollections Cream Card Stock
~Paula Deen Designer paper
~DecoArt Twinkles
~Recycled Chipboard
~Paper Accents Pound-O-Paper Card Stock

Monday, June 10, 2013

Paper Bag Ribbon - Practical Scrappers Challenge

Hi Everybody,

Today I am sharing with you my project for Practical Scrappers. Being a part of the Ten Things group, we are to find different uses for items.  The challenge at hand today is paper bag.  Now many of us know to use paper bags for mini albums, flowers, pockets, etc. but I am taking my paper bag and turning it into ribbon.  I came across a post from Roben-Marie Smith who shows a great tutorial on how to turn a paper bag into ribbon. So that is what I did and I made a spool on which to place the ribbon on. 


I am really please with how this ribbon has turned out.  I sewed on some white lace and then wove a pink grosgrain ribbon in between to add a bit of color.  The great part is I can change the pink ribbon as needed.  It is so super easy to make and it would be a great addition to embellish a gift, or a layout, or anything else you can think of!

Be sure to check out Roben's tutorial blog on how to make this.  It is a great way to use our scraps.

Thanks for stopping by everyone!!  I'll see you next time.

Kelli

Wednesday, June 5, 2013

Scallop Butterflies

Hi Everybody,

In keeping with the theme of scallops I made some more butterflies to embellish a thank you card for hubs to send out.  I think these are so super cute and an easy way to use the scraps and coordinate with the paper line.


I used the Colorbok Homespun collection, which I adore, some lace and a stamp and that it. Well minus  the flat-back pearls and photo corner.  I think it came out pretty cute.

That's all for today guys.  Just a quick and simple post.  I want to thank you for stopping by and sharing your time and I will see you in the next one.

Kelli

Tuesday, June 4, 2013

Practical Scrapper DT Project - Scallops

Hi Everybody,

I am really pumped to show you my first project as a member for the Design Team of Practical Scrappers (PS)!!

The challenge was to use scallops in a creative way.  So I thought and thought and thought and while thinking I came up with several ways to use a scallop shape and decided on using two of them on a card.  Among the many thoughts for scallop use I created a butterfly and a dress form.

So here are some pic of the scallop butterfly, the dress form and some other close ups of the card.


For the butterfly I snipped off two opposing scallops from a Fiskar's punch (I think it is the medium 1" poppy punch) and used some baker's twine for the body.  For the dress form I cut two slits toward the center to create the top half and them folded the scallop down to create the dress.  This worked out really well since I don't have a dress form die.  This technique would work great on double sided paper. I punched out two scallops and glued them together.

Oh, and that gorgeous lace you see is from my Etsy store.

I definitely recommend this technique, quick and easy - a crafter's dream.

So there you have it everybody.  I want to thank you all for stopping by and give a big shout out to the new subbies!!!  All I will see you all next time.


Kelli

What I used...
~Glitz Hello Friend 6x6 Paper pack
~Ranger Adirondack paint dabber
~Wooden Heart shape
~Miss Elizabeth's adhesive paper lace
~Twinery Carribean Twine
~Mulberry flowers
~Offray Ribbon
~Fiskar's Scallop and Poppy punches
~Sentiment from Tiddly Inks
~Antique Ivory Floral lace