Hi Everybody!
So, I know it has been long overdue but I have another card for you. You want to know what my struggle has been during this series; finding adorable bunnies stamps to use. I have been to my local craft stores and didn't see too much there and then I realized I want to showcase some artist that you might not be familiar with that I think have the Cutest stamps. So every card in this series has and will feature digital stamps from various artists.
Today's card comes from Stampfairy and features the Bunny1 stamp. You can download the stamp here. And here is my card using this adorable stamp.
Isn't this such a sweet bunny?! I am in love with him. I really tried to keep this card simple and not go too crazy by adding the flowers, bling and other embellies. I think it is simple and sweet. So, this is card #3; stay tuned for card #4.
Thanks for stopping by everybody and thank you for all your comments. I SO appreciate you taking the time to share your thoughts and love. I included links to all the products I used (well the ones I could find).
Until the next time..
Tootles,
Kelli
What I used..
~We R Memory Keepers, 6x6 Cotton Tail paper pad
~Stamp Fairy digital stamp
~DecoArt Crystal Twinkles
~Recollections card stock
~Memento Tuxedo, black ink
~Studio G stamps
~1/8 Satin Ribbon
I have connected link to where you can find these products but these are in no way the cheapest prices. If you would like me to link where I purchased these items from let me know.
Showing posts with label cricut. Show all posts
Wednesday, April 18, 2012
Wednesday, April 4, 2012
Bunny Series Card #2
Hi Everyone,
Here is card #2 in my Bunny Series. I used another Sliekje image. I used her Easter 2 stamp that is just simply adorable. I colored the image with colored pencils. Isn't he cute!!
I used white Recollections card stock, the 6x6 paper pad from We R Memory Keepers-Cotton Tails. I am in love with this collection. The golden yellow paper is from an old DCWV mat stack.
I embellished the card with golden yellow brads from my stash. I am not sure who they are from, Making Memories I think. The cream flowers are from Making Memories and the olive flower is from Michael's $1 bin. I also added some seam binding that matched the brads.
This card for whatever reason was a little bit of a challenge for me. I just couldn't find the right color pairing. Maybe I was tired when I started this card, I don't know. What are your thoughts? I do want to give a shout out to Krafthead who gave me the suggestion of adding a scallop behind the image and adding a flower. Thanks Sis!! :D The scallop I used is from the Paper Lace Cricut Cartridge.
I encourage you all to check these ladies fabulous blog!! If you are new to their site let them know that I encouraged you to check them out.
I am submitting this card in the Cooking With Cricut Challenge. Click here for more details. To participate you must:
Stay tuned for Card #3 in my Bunny series and I always appreciate you stopping by!!
Kelli
Friday, May 13, 2011
Butterfly Mini Album using the Cricut Cartridge "Plantin Schoolbook"
Hello All You Creative Geniuses,
Everywhere I turn lately I see butterflies; and not just because it is Spring. :) In paper collections, embellishments, in videos, everywhere. So in celebrating the loveliness of Spring and keeping in line with the butterfly theme, I decided that I would make a Butterfly Mini Album. Now this album may be a little different than what you have seen so far. To make this album I will use the Cricut Expression and the Plantin Schoolbook cartridge. You're probably wondering how I am going to pull that one off since there are no butterflies on that cartridge. Well for my next trick or blog (meaning this one) I will attempt to make a Butterfly Mini Album using recycled chipboard and the Cricut Plantin Schoolbook font cartridge. Now, onto Step One
Step 1:
Chipboard is everywhere around us. From cereal boxes, to USPS mailing envelopes, to the back of a loose leaf tablet; all we have to do is look. So start with some chipboard. You can buy if you need to. I am going to recycle this cereal box of Honey Nut Cheerios. Cut the box apart on each and every fold.

Step 4:
Inside cover on the left and page 2 on the right with two tags...
Page 3 has a butterfly insert with a little mini album hiding inside the butterfly...
Page 4 has a circle photo-mat with journaling on the back and a huge floral cut out with room for more journaling.
Everywhere I turn lately I see butterflies; and not just because it is Spring. :) In paper collections, embellishments, in videos, everywhere. So in celebrating the loveliness of Spring and keeping in line with the butterfly theme, I decided that I would make a Butterfly Mini Album. Now this album may be a little different than what you have seen so far. To make this album I will use the Cricut Expression and the Plantin Schoolbook cartridge. You're probably wondering how I am going to pull that one off since there are no butterflies on that cartridge. Well for my next trick or blog (meaning this one) I will attempt to make a Butterfly Mini Album using recycled chipboard and the Cricut Plantin Schoolbook font cartridge. Now, onto Step One
Step 1:
Chipboard is everywhere around us. From cereal boxes, to USPS mailing envelopes, to the back of a loose leaf tablet; all we have to do is look. So start with some chipboard. You can buy if you need to. I am going to recycle this cereal box of Honey Nut Cheerios. Cut the box apart on each and every fold.
Step 2:
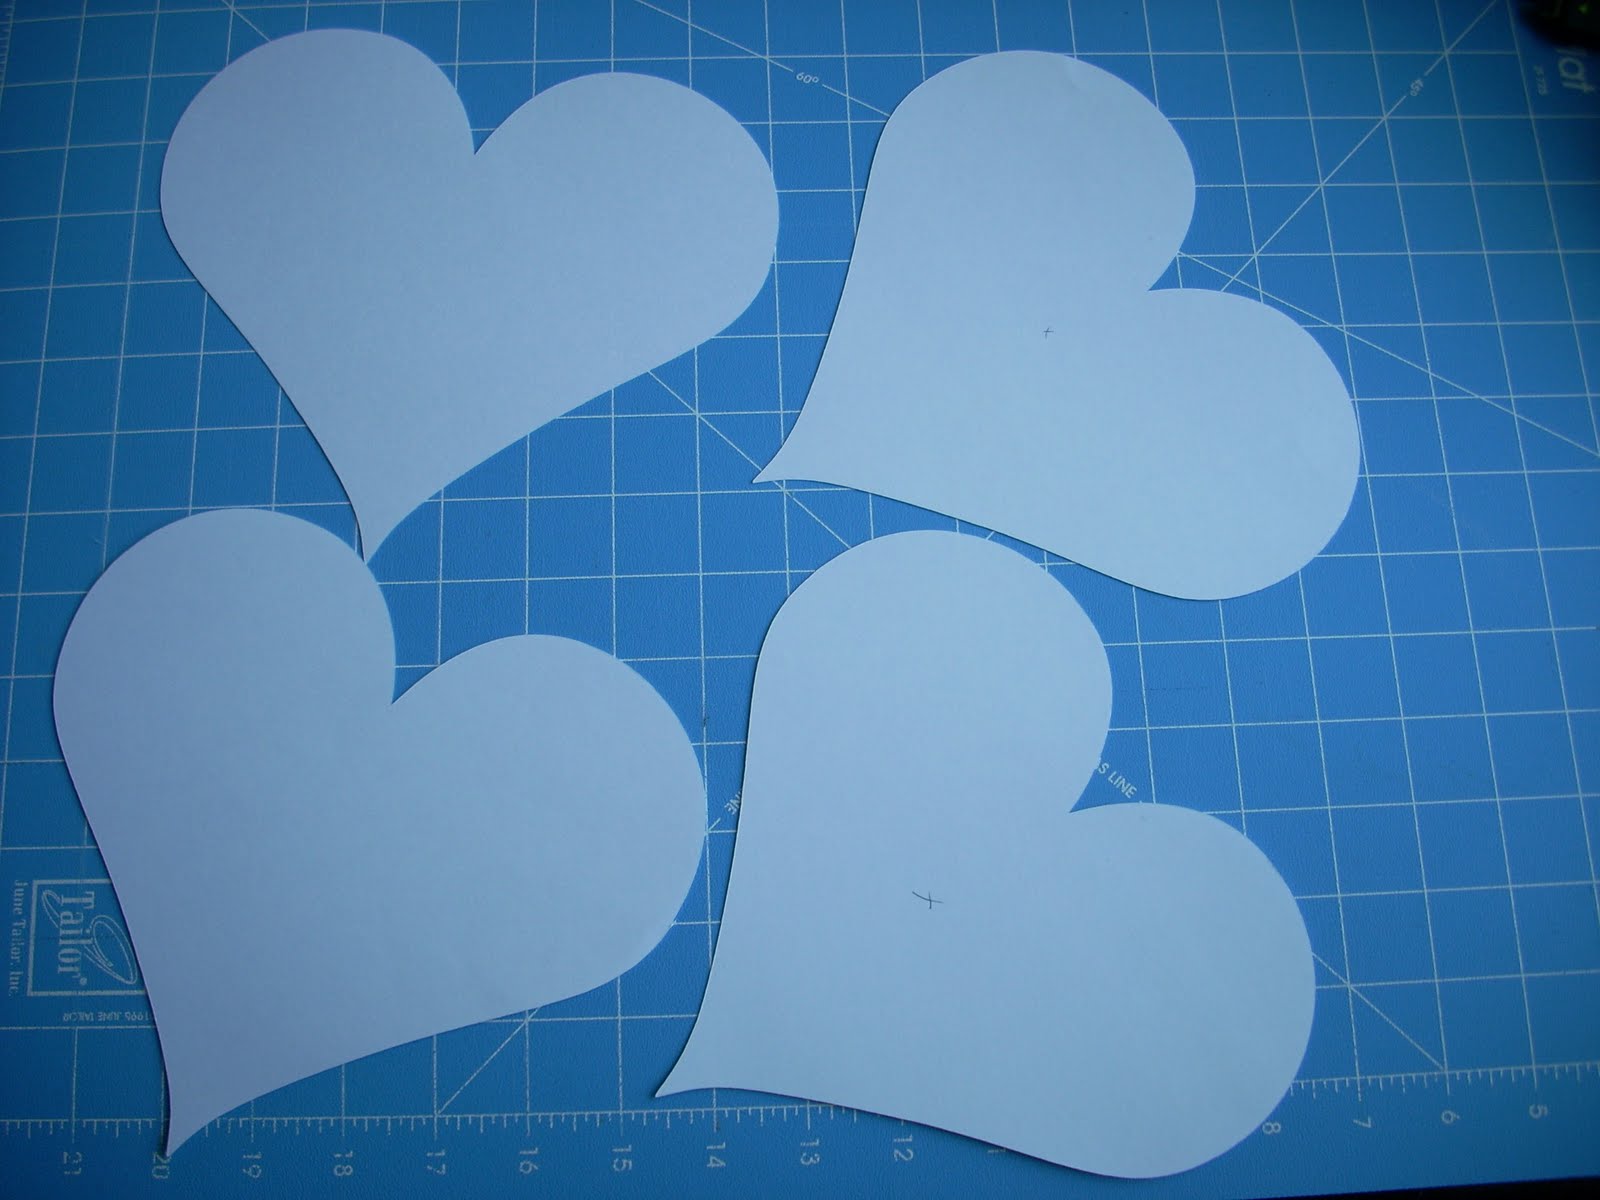
The length of your box (left-right) will determine the largest size image you can cut. The box I used is 7 1/2" so I will cut my image at a size of 7". Cricut time! Place your Cricut size on 7", your pressure on max, your speed on high, make sure the Plantin school cartridge is inserted, and then press the HEART button and cut. Yes, I said the heart button. This heart will create your butterfly. You will need to cut this multiple times. I recommend cutting this image 4 times.
Once cut, you will need to cut the heart image again on the second panel but this time use the flip image. The flip is so that the hearts, when back to back, line up nicely. Make sure to mark which image is the flipped image. The flipped one will be your back cover.
Repeat this process for the inside pages. You can make as many pages as you desire. If you don't have extra chipboard then you can cut hearts out of card stock and glue them together. For my butterfly I cut out 4 pages or 8 hearts with my Cricut using card stock. (Hey, there's only two of us in the house right now and we can't eat cereal that fast). Then I glued one of the regular cut hearts and a flipped heart together
When we were kids, one of the first images that we learned to draw was butterfly because it was so easy to do. Well, at least I did. I remembered that making a butterfly was as easy as drawing two '3's side-by-side; this gave you the wings. And then I remembered that to make a heart you use a '3' and a 'V'. So I added two and two and I got a butterfly.
Step 3:
Now measure and cut 2 inches off from the bottom point going to the top of the heart. This is where the shape of the butterfly really starts to take form. Repeat this process with each page you created.
Step 4:
Cut your holes for binding. If you are using binder rings then this is the point where you would want to punch your holes; this way when you cover the heart/butterfly wing with paper you know where to re-punch the holes. If you are using another binding method then you may want to skip this part.
Step 5:
Now is the time to cut all the patterned paper for your inside pages and covers. I decided to use a designer stack that I have had for awhile. So, I chose the "Jolie Chocolat" 8x8 paper stack by S.E.I. I think this paper is just perfect for a butterfly. Assemble your patterned/designer paper and glue them to each of your hearts. Don't forget to mark which pieces are the flipped cuts. You will probably want to adjust your cricut settings since you are not cutting the chipboard any more.
Step 6:
Now, all that is left to do is to embellish, create your tags and add your pics. At this point my album is pretty much done minus the photos but I still have a few more embellishments and tags to create. But I will show you what I have done thus far. Feel free to leave comments and let me know what you think.
This is the cover...
Inside cover on the left and page 2 on the right with two tags...
Page 3 has a butterfly insert with a little mini album hiding inside the butterfly...
Page 4 has a circle photo-mat with journaling on the back and a huge floral cut out with room for more journaling.
Pages 5 and 6 have pockets with loads of tags...
Page 7 and inside of the back cover...
This is just a quick view of the album as it stands right now. When I finish the album completely I will do a video and show you all. We just got a new camera so prayerfully the video will come out nice and clear.
***Update: So I have created a new album that was Published in the July, 2013 edition of Cricut magazine. Here is the link to see the photos: http://favor8favors.blogspot.com/2013/10/ive-been-published.html
So until later everybody. Thank you for sharing some time with me.
Kelli
Favorite Favors
"Lord, I open my heart. Fill it with nothing but You. I open my heart, as the old gives way to the new. Lord, cleanse me with, Your holy fire, until all that remains is earnest desire. To open my heart and be filled, with nothing but You." ~sung by Nicole Binion on album the "When Women Worship" by Mary Alessi & Friends
Thursday, May 5, 2011
Apart from you but not Forgotten & Mother's Day card
Hello Friends!
I pray you all are having a fabulous week!! I know I have been away for awhile and I apologize for that but please know that I thought about you all and each of you were in my thoughts and prayers.
I have been working on a bunch of projects but the reason why you haven't seen them is because of a lack of memory space in my computer. I have been diligently trying to clear the computer of all unneeded files and programs. I still have a ways to go but I have cleared enough room to import photos from my camera and show you all that I have been working on.
***I have to give a big THANK YOU to Sandy O @ Paper Transformer for reminding me to get it into high gear and create my Mother's Day cards! :D ***
So, this blog will be about my Mother's Day card. I am really please with how this came out and I am really proud of myself. I pray you like it. Please let me know your thoughts. So without further delay...
...Here it is!
I pray you all are having a fabulous week!! I know I have been away for awhile and I apologize for that but please know that I thought about you all and each of you were in my thoughts and prayers.
I have been working on a bunch of projects but the reason why you haven't seen them is because of a lack of memory space in my computer. I have been diligently trying to clear the computer of all unneeded files and programs. I still have a ways to go but I have cleared enough room to import photos from my camera and show you all that I have been working on.
***I have to give a big THANK YOU to Sandy O @ Paper Transformer for reminding me to get it into high gear and create my Mother's Day cards! :D ***
So, this blog will be about my Mother's Day card. I am really please with how this came out and I am really proud of myself. I pray you like it. Please let me know your thoughts. So without further delay...
...Here it is!
I used a piece of Paper from K&Company. I think it is called Garden Paradise; I know that it is an old collection but I thought it was perfect. The card base is a cream color that I cut at 6 1/4" x 9 and folded in half to make a 6 1/4" x 4 1/2" card. I cut a piece of tan card stock at 6" x 4 1/4" and then cut the patterned paper at 5 3/4 x 4. I wanted a very thin border on this card.
I adhered a piece of chocolate brown ribbon onto a piece of cream antique lace and then wrapped it around the patterned paper and tan mat. I used my Cricut Plantin Schoolbook cartridge and cut an oval at 2 1/2" in the tan color and another at 2 1/4" in the patterned paper and adhered them together. Then I used the Nature's Garden Watercolor Alphabet Stickers by Colorbok to spell out MOM. I propped the sentiment on some 3D dimensional stickers, added an little bling from K&Company and viola!
I added some cream flowers to the side of the sentiment and the curly wire. Then I took some glitter glue writer in crystal by Deco Art and outlined the flower petals, leaf and curly wire. Then I added the butterfly and added the glitter to the butterfly. Finally I added the K&Company bling to the corners and the front of the card was done.
Can you see the sparkle? I tried to really capture the twinkle on the flowers but my camera wouldn't behave.
I blurred out the written part of the card but here is the inside. I didn't want to waste any part of this beautiful paper so I made the open oval part a picture window and filled it with butterflies and covered the butterflies with the glitter.
The camera really captured the twinkle on the butterflies here. I love how this card came out. I pray my Mom likes it as well.
Alright amigos, it's time to go for now but until we meet again; thanks for sharing your time with me.
Kelli
Favorite Favors
To all the virtuous women! "...Many daughters have done virtuously, nobly, and well [with strength of character that is steadfast in goodness], but you excel them all." ~Proverbs 31:10-31 AMP
HAPPY MOTHER'S DAY
Thursday, March 17, 2011
Inspired Projects
A Big Hi and Hello To Everyone!
WOW!!! I can't believe that it has been a little over a week since I last spoke, wrote, blogged to you all. I can not let that happen again...I missed you all too much!! This past week I have been completing projects that I have begun, starting new projects and creating some much needed cards. There have also been so many new developments that it is kinda hard to keep track of them all. I have so many ideas in head that I had to write them down and I can't remember them all to write them down. No worries, they will return to mind as all good ideas do. :D
Okay, enough talk. Let me show you some of the projects that have been done...
If you are a friend on Facebook then you may have seen this card. I have seen so many wonderful, colorful cards that I have loved; that became the inspiration for this one. For this card I used a Staples brand, acid & lignin free white card stock for the base. Best Occasions Deluxe Card stock in the maze yellow as the under mat and DMD's Adhesive Mat Stacks in their Fancy Pants design is where the yellow printed paper is from. I added a satin white ribbon along the bottom and a blue star brad from Making Memories. The little bee girl was cut with the Cricut using the Paper Doll Dress Up Cartridge at 3" (pg 70-outfit, pg 41-hair). Her bee wings were cut with the same cartridge but at 1" (pg 75-wings). I took a standard size hole punch and cut out her little bee friends; I drew the wings, head and stinger. The sentiment was cut with Cricut using the Stong Script font at 1". And that is all there is to it. Isn't it cute?!
"Do not despise these small beginnings, for the Lord rejoices to see the work begin, to see the plumb line in Zerubbabel’s hand.” ~Zechariah 4:10
WOW!!! I can't believe that it has been a little over a week since I last spoke, wrote, blogged to you all. I can not let that happen again...I missed you all too much!! This past week I have been completing projects that I have begun, starting new projects and creating some much needed cards. There have also been so many new developments that it is kinda hard to keep track of them all. I have so many ideas in head that I had to write them down and I can't remember them all to write them down. No worries, they will return to mind as all good ideas do. :D
Okay, enough talk. Let me show you some of the projects that have been done...
If you are a friend on Facebook then you may have seen this card. I have seen so many wonderful, colorful cards that I have loved; that became the inspiration for this one. For this card I used a Staples brand, acid & lignin free white card stock for the base. Best Occasions Deluxe Card stock in the maze yellow as the under mat and DMD's Adhesive Mat Stacks in their Fancy Pants design is where the yellow printed paper is from. I added a satin white ribbon along the bottom and a blue star brad from Making Memories. The little bee girl was cut with the Cricut using the Paper Doll Dress Up Cartridge at 3" (pg 70-outfit, pg 41-hair). Her bee wings were cut with the same cartridge but at 1" (pg 75-wings). I took a standard size hole punch and cut out her little bee friends; I drew the wings, head and stinger. The sentiment was cut with Cricut using the Stong Script font at 1". And that is all there is to it. Isn't it cute?!
This sweet little cards was inspired/recreated from a card I saw created by Jewels Paper Jewels http://www.youtube.com/watch?v=vnYz5z3RKaE I adored this card and had to make it. I used the Cricut Cartridge Home Decor to cut out the little birdies at 1" and the flower at 2". I used the Plantin Schoolbook Cartridge to cut the circle at 1 1/2". To cut the edges of the mats the birds are on and the card I used decorative scissors. I just really like to colors of this card. The white card stock is the Staples brand, the green is from Best Occasions and the patterned paper is from Hot Hues - Designer Paper pack. The sentiment, "Just a little Tweet" was hand written.
This "Missing Ewe" card is one that I am very proud of because it features new patterned paper from The Flourish Collection by Favorite Favors. This is the very first digital paper collection. Six different papers - 3 patterned, 3 solids, borders, flourishes, alphabets in 3 different colors; I love it!! Can't wait to show it to you!! I will let you know when it is ready. So let's talk about the card. White card stock from Staples, black under mat is from DMDs paper reflection. Pattern paper - OURS! The die-cut frame is from K&Company and the ewe is cut from the Paper Dolls Dress Up Cricut Cartridge at 3" (pg 77). The months are stamped using the Autumn Leaves Messy Dates Stamps and gold Colox Box ink. The sentiment was again hand written on this card. This is my favorite Card to date. I am so, so excited about it and all that this card means and represents.
It means that Favorite Favors is expanding and new ideas are flowing and that is always a good thing. We are expanding, creating digital papers, embellishment and even digital stamps. I will do a blog on the stamps as well. We also will soon be going video! WHOO HOO!!!! So you can see that there are a lot of new developments on the horizon and as soon as they are ready I will let you all know. :D
Thank you much for stopping by!
Favorite Favors <3
"Do not despise these small beginnings, for the L
Subscribe to:
Posts (Atom)